From specification to code: A practical AI-powered workflow for developers
A step-by-step report on how we integrated LLMs into our feature delivery process — without losing control
Why this matters
AI is already reshaping how we write code. But while large language models (LLMs) can generate working software fast, they also raise questions about quality, control, and predictability. One-shot prompts that go straight from spec to code often miss key details or make subtle assumptions — costing you hours in clean-up later.
This post offers a hands-on, repeatable workflow for using LLMs with precision. It separates planning from execution, introduces clear review gates, and helps you ship faster without sacrificing engineering discipline.
This is a practical pattern used by one of our teams that might help you too.
How it flows in practice
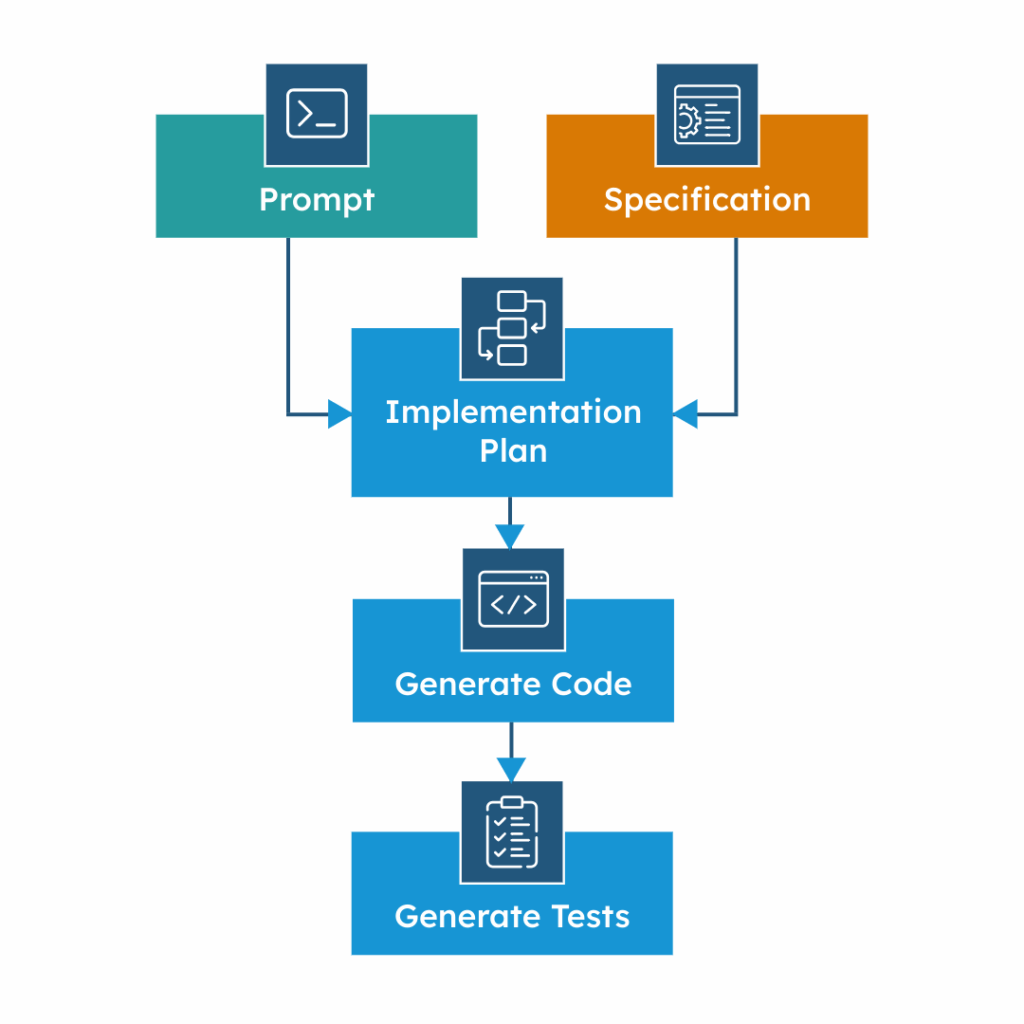
We started by writing a planning prompt. The prompt links to the clear specification(s) and points to the files and patterns in the code to work with. From that prompt, the model returned an implementation plan that names the files to change and the shape of the edits. We reviewed and iterated on the plan until it was right. Only then did we ask the model to implement the code according to the approved plan. After a quick human review and any fixes, we asked the model to continue with the plan by implementing all required tests. Trim noisy/duplicated tests, and when code and tests both look good, commit and open a Pull Request.
Every step has a feedback loop. If something feels off, go one step back. Don’t let mistakes compound.
Tools we used
We ran this workflow using Claude Code (Opus 4 and Sonnet 4) inside IntelliJ IDEA, but any LLM that accepts project context from the command line will work. Claude had full access to source files — no context injection games required.
A practical AI-powered workflow for developers
Step 1: From spec to implementation plan
We don’t jump straight to “generate code”. First, we generate a plan. That plan is a concrete, reviewable proposal of how the model intends to implement the feature.
Providing a clear, comprehensive specification is essential because it defines the feature in full. If anything is left out or ambiguous, the model will fill the gaps with its own assumptions — and those guesses often create unpredictable results and unnecessary rework. The specification is the authoritative statement of what to build; the planning prompt tells the model how to think about it by pointing to the right files, established patterns, and any constraints or details that must be considered.
We take this extra step because one-shot prompts that generate code directly tend to wander. They introduce hidden assumptions, stray from established contracts, and produce noisy tests. A short implementation plan, by contrast, gives us a reviewable artifact before any code exists. It forces the scope to be explicit — which files to touch, which contracts to follow, which constraints to respect — and it often surfaces clarifying questions that improve the outcome.
By reviewing the plan before code exists, we avoid expensive rework. Our results were cleaner diffs, faster iterations, and better alignment with architectural and business expectations.
Anatomy of a good planning prompt
We use four sections:
#GOAL – Describe the feature and outcome in one short block. Keep it tight. Avoid trying to do too much at once.
#ANALYSIS – Link to specs, list relevant files, name patterns to follow. Include non-functionals, APIs, flags, edge cases.
#IMPLEMENTATION – Ask for a step-by-step implementation plan only. No code. Request edits by file, design decisions, and a focused test strategy.
#CONSTRAINTS – Tell the model what not to do. No execution. Ask clarifying questions. Wait for human approval.
Example: Planning a New API Endpoint
Here’s a real planning prompt we used:
# GOAL
I want to implement a client verification endpoint: `GET /clients/{clientId}`.

# ANALYSIS
- Swagger: @docs/client-api.yaml
- Upstream: UserManagementService GET/client, spec in @docs/umg.yaml
- Mappings: @doc/get-client/mapping.md
- Add to: ClientController
- New Service: ClientProfileService (follow patterns in ClientAccountService)

# IMPLEMENTATION
Provide an implementation plan including required changes to existing code and tests.
Save as markdown in @docs/get-client/implementation-plan.md

# CONSTRAINTS
- Do not execute the plan
- Ask clarifying questions if in doubt, don’t make assumptions
- Wait for human review
Claude responded with a structured plan that looked something like this:
File-level changes — which files to update, classes to add, and methods to create
Architecture flow — how controllers, services, and upstreams connect, with clear data mappings
Execution order — phased steps that make dependencies and sequencing explicit
Error handling — status codes, exception patterns, and edge cases to cover
Testing strategy — unit vs. integration tests, with guidance on scope and data
Tip: We found Opus 4 slightly better for planning, but Sonnet 4 was often good enough — and significantly cheaper.
Step 2: Execute the plan (code only)
Once the plan was approved, we asked Claude to generate code only, holding off on tests until later. This helped reduce noise and made the review more focused. We stuck to Sonnet 4 for code generation. Once a good plan exists, advanced reasoning isn’t usually required.
Review the code carefully
Check that the code matches the plan exactly:
Files and classes are correctly named
Patterns and contracts are respected
Business logic reflects the intent
Edge cases are handled
No files outside scope are touched
Once happy, we committed to a feature branch. That gave us a clean baseline before adding tests.
Step 3: Add tests and validate
Using the same plan, we asked Claude to generate all required tests and validation logic. This step can be trickier. LLMs are more likely to produce redundant or superficial edge case tests here.
We reviewed:
Test names match test logic
Duplicates or no-ops are deleted
Full coverage exists for the key flows
Once all tests passed and the logic checked out, we opened a PR.
Final thoughts: don’t skip the plan
The real power of this approach is its predictability. You move faster not by cutting corners, but by cutting rework. By separating planning from execution, you make every LLM output more deliberate, more reviewable, and more reliable.
Have you tried using LLMs this way? Got a workflow that works better? We’d love to hear how you’re integrating AI into your software delivery — and swap lessons learned. Get in touch with us at Equal Experts.
Disclaimer:
This is the author’s personal workflow, not an official Equal Experts methodology. We’re not affiliated with any tools mentioned — we just use what works.
You may also like
Blog
From madness to method with AI coding: Part 1 – Meta-prompting
Blog
Coding with LLMs: are we re-inventing linguistics with prompts?
Case Study
Transforming software delivery with AI, responsibly: Department for Environment, Food & Rural Affairs
Get in touch
Solving a complex business problem? You need experts by your side.
All business models have their pros and cons. But, when you consider the type of problems we help our clients to solve at Equal Experts, it’s worth thinking about the level of experience and the best consultancy approach to solve them.
If you’d like to find out more about working with us – get in touch. We’d love to hear from you.