From madness to method with AI coding: Part 3 – The Driving Shot
So far in this series on bringing methodology to AI-assisted coding, we’ve discussed meta-prompting and guardrails – or contextual rules. These are the foundations; now we actually want to start building!
The Driving Shot: the first step in AI-powered development
If this were the Masters, you’d now be stepping up to the tee to take your first drive towards the green. You wouldn’t tap your way to the green with a putter (that’s the equivalent of vibe-coding in our world). Instead, you reach for your driver and hit it hard, aiming to get as close to the hole as possible. This post is about that crucial opening move – the structured prompt – that sets the trajectory for everything that follows.
Of course, only in rare cases do you land a hole-in-one. More often, you’ll need to adjust your aim after the first attempt. Later in this series, we’ll cover those “putting” refinements – our corrective actions – but for now, we’re focused on the Drive: the disciplined way we start an AI-assisted build.
Mulligans are free!
So, you’ve taken your first swing and the ball veers into the rough. No problem: that’s just a Mulligan. As this is a friendly game (not the Masters!) you get as many shots as you want at teeing off. In fact, you can view each attempt as an opportunity to refine your setup, allowing you to get closer to the green. The same holds true with AI-assisted coding: the first generated output is rarely perfect, but each iteration helps us improve our prompt and our direction.
Again, we begin with a meta-prompt. Rather than improvising, we use a structured template designed to produce high-quality prompts for an LLM. Here’s an example of the template I rely on for feature development:
# [Feature/System Name]

*Write a brief paragraph describing the high-level purpose and context.
What problem does this solve? What is the main objective?
Keep this concise and focused on the "why" rather than the "how".*

## Requirements

*List the specific, measurable acceptance criteria that define when this feature is complete.
These should be testable and unambiguous. Think of these as your definition of done.*

- Requirement 1
- Requirement 2
- Requirement 3

## Rules

*Specify any rules files that should be included when working on this feature.
This includes any relevant rule files for implementing this slice.
The rules files are usually found under the `rules/` directory of this project.*

- rules/my-rules-1.md
- rules/my-rules-2.md
- rules/my-rules-3.md

## Domain

*If applicable, describe the core domain model using pseudo-code in a
modern language like TypeScript or Kotlin. Focus on the key entities, relationships, and business logic.
This section helps establish the mental model for the feature.*

// Core domain representation in markdown block

## Extra Considerations

*List important factors that need special attention during implementation.
This often grows as you discover edge cases or constraints during development.
Think about non-functional requirements, constraints, or gotchas.*

- Consideration 1
- Consideration 2
- Consideration 3

## Testing Considerations

*Describe how you want this feature to be tested.
What types of tests are needed? What scenarios should be covered? What are the quality gates?*

*Examples: unit test coverage requirements, integration testing adapters,
acceptance testing a workflow, performance benchmarks, etc.*

## Implementation Notes

*Document your preferences for how this should be built.
This might include architectural patterns, coding standards, technology choices,
or specific approaches you want followed.*

*Examples: preferred design patterns, coding style,
performance requirements, technology constraints*

## Specification by Example

*Provide concrete examples of what the feature should do.
This could be API request/response examples, Gherkin scenarios,
sample CSV representation, or user interaction flows. Make the abstract requirements tangible.*

*Examples: Gherkin scenarios, JSON payload, UI mockups, CSV samples*

## Verification

*Create a checklist to verify that the feature is complete and working correctly.
These should be actionable items that can be checked off systematically.*

- [ ] Verification item 1
- [ ] Verification item 2
- [ ] Verification item 3
Getting advice from the caddie
With the template in hand, it’s time to line up the shot. As before, we’re using the open-source project SDKMAN! as a guinea pig for preparing the Driving Prompt. Again, I provide as much context as I can in a meta-prompt to my ‘caddie’, the LLM, then let it make sense of it by smashing my meta-prompt and the template together.
Please generate me a prompt for the following feature:

I would like to incorporate auditing of every download that is initiated through the Candidate Version Download endpoint.
Use the newly introduced AuditRepository to write these entries.
Please collect relevant audit information such as the X-Real-IP and X-User-Agent headers
to fulfil each audit entry. Update the domain model and persistence layer where applicable
to handle nullability of these fields.

We should have feature parity with the legacy application's implementation.
Please refer to the legacy_broker_service.md for details on the behaviour and implementation of
auditing for candidate version downloads.

Store the platform and dist in each audit entry as the persistentId of the Platform domain model.

Please structure your prompt according to the 00-driving_shot_template.md, and place the final result
in the prompts directory with the name 11-candidate_version_download_audit-driving_shot.md.
As you can see, I didn’t use any formal structure; the LLM will apply the structure that I provided in the template and deliver the prompt in the designated directory, where we will review it carefully. If I approve of the final result, I commit this document to Git and prepare myself for the first Drive!
Please execute the following prompt: 11-candidate_version_download_audit-driving_shot.md
The code generation can take some time, depending on the size of your request. (If you continuously see the LLM missing the mark, ensure that you have (a) adequate guardrails in place and (b) that the specified feature isn’t too large, overwhelming the LLM.
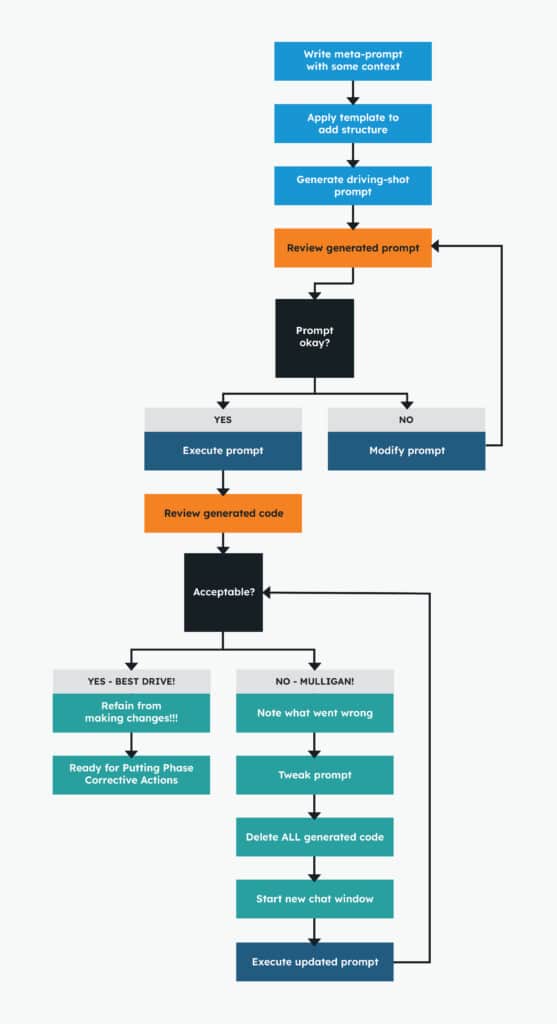
Eventually, it completes the work and you’re left with the most important task: reviewing and scrutinising the generated code. Usually, the first pass of generated code doesn’t meet expectations, so you take note of what went wrong and tweak your prompt accordingly.
Each iteration is a Mulligan: blow away all the generated code, update the prompt, commit the improvements to Git, and reissue the prompt in a fresh agent session (to avoid diluted context). As the prompt evolves with each Mulligan, the shot improves. Eventually, we achieve our Best Drive – the clean, high-trajectory output that puts us in a strong position for the next phase. This flowchart might help you to visualise what I mean:
Course corrections
Even a solid Drive doesn’t guarantee the ball lands where you want it. In practice, it takes two or three swings before the generation aligns closely with our expectations. But once the verification checklist is satisfied – and we have a green build and well-formatted code – we commit the generated code (with any imperfections) to Git.
At this stage, we resist the urge to tweak the code by hand. The putting phase – the corrective actions – comes later, and it deserves its own focused process. That’s where we shape the output into production-ready quality.
For now, I’ll leave you with this reminder of the goal: build a repeatable methodology that takes us from tee to green through disciplined prompts, structured retries, and systematic review. If this sounds like something your team could use help with, stay tuned for our next instalment, or get in touch to explore how Equal Experts can support your organisation.
You may also like
Blog
From madness to method with AI coding: Part 1 – Meta-prompting
Blog
From madness to method with AI coding: Part 2 – Guardrails
Blog
Why is AI making us talk about “developer productivity” (again)?
Get in touch
Solving a complex business problem? You need experts by your side.
All business models have their pros and cons. But, when you consider the type of problems we help our clients to solve at Equal Experts, it’s worth thinking about the level of experience and the best consultancy approach to solve them.
If you’d like to find out more about working with us – get in touch. We’d love to hear from you.